Getting rid of piles of paperwork when you live in a small space is one of the easiest ways to declutter. Signing up for paperless bill paying and automating will save you time, eliminate stress, and most importantly declutter your desk.
When you use a monthly budget checklist, you make sure everything gets paid when it is supposed to and you stay on budget with your paperless bill paying.
We all get paid at different times of the month. The most common ways paydays land is monthly, twice a month, bi-weekly, and weekly. No matter how you get paid, you’ll want to use my easy free monthly budget checklist.
This article isn’t about how to budget. It is about how to move to paperless bill paying and how to easily keep track of your budget with a checklist based on how often you get paid.
As an example, let’s pretend you get paid on the first and the fifteenth of the month. If you get paid every week or bi-weekly then you have a bit more of a challenge and I have some helpful tips at the end of this article.
This article includes affiliate links for a couple of books I recommend. If you click on and purchase through my link, it does not cost you any extra. I do earn a small commission which helps me continue to live a big life in a small house.
Gather supplies
- Post-It Notes
- Pen
- Calculator
- My Free Monthly Budget Checklist
Sign up for paperless bill paying
Sign up for paperless bill paying and auto pay with all the bills that give you the option. After you log into the bill’s website, you will want to make note of the day of the month the bill will be paid and the amount. You sometimes have the option when you sign up for paperless bill paying to pay the bill on the day it posts or the day the bill is due. You can choose which way works best for you and make a note of it.
Make note of the amount of the bill. Some bills are the same amount each month and some, like utilities, fluctuate each month. For the inconsistent monthly bills, look up the last 12 months amount due. Decide if you want to use the average amount in your budget or the highest month. I like to use the highest month for my monthly budget. This gives me more wiggle room in the bank account on lower months and ensures I don’t fall short on the high months.
Make a list of non-automated expenses
Now, make a list of all non-automated monthly expenses. This would include things like groceries, gasoline, dining out, entertainment, gifts, and car maintenance. Think about the things you use your debit card for.
Assign a pay period to each bill
Figure out what pay period each bill will get paid from. Using the example of the first and the fifteenth, here is how you tackle this step.
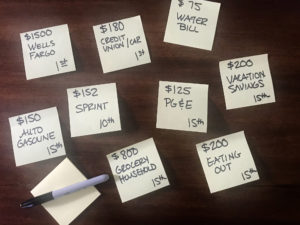
Grab a stack of post-it notes and on each individual note; write down the bill name, date paid, and the amount due. Stick them all in one place. I like to stick them on the table or countertop. However, you can stick them to the wall, the door, or the fridge.
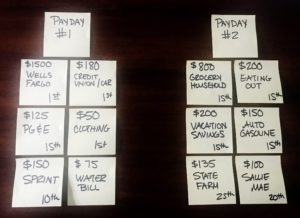
The objective of this step is to divide your bills into two paydays. You are going to make two columns for your post-it notes. One column is for your payday on the first of the month and the other column is for your payday on the fifteenth of the month.
Start placing your post-it notes into columns using the bills with the higher amounts. Pay attention to the due dates. For most of you, your mortgage or rent as it is traditionally due on the first of the month. Place that post-it note in the first column.
Continue adding your post-it notes to the first column working most expensive bill to least expensive keeping in mind the due dates. You probably won’t be able to make your columns add up exactly to your pay periods, but you can get close. Keep moving your post-it notes back and forth until you get the amounts close to matching that of your payday.
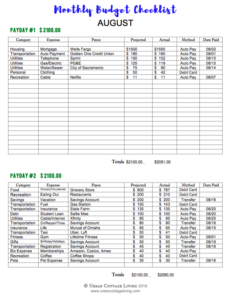
Remember to pay attention to the automatic payment date. You’ll notice in my example below, the gym membership automatically drafts on the first of the month. However, this bill worked into my checklist for the payday on the fifteenth of the month. In this case, the funds for that bill are set aside two weeks ahead of time so it can be paid on the first of the month.
If your columns don’t add up perfectly, you need to make sure that the two columns added together do not exceed your actual monthly income. For example, if your payday on the first goes over by $20, then make sure your payday on the fifteenth is $20 less to make up for it.
Keep extra funds in your bank account
When you live paycheck to paycheck this is hard to do. However, some of the reasons you want to use the paperless bill paying system are to save time, eliminate stress, and to declutter your desk. Eliminating worry that you don’t have enough funds in your bank account to cover your bills each pay period defeats the time and stress goals, so work hard to build up the extra funds.
Dave Ramsey, financial expert and author of The Total Money Makeover and creator of Financial Peace University, recommends having $1000 emergency fund as baby step number one in achieving financial peace. If you don’t have funds to keep any extra in your bank account, keep your emergency fund there. Don’t misunderstand me. This isn’t for you to spend. It’s just sort of an invisible insurance policy if an automatic bill drafts a day or two before a payday.
You will want to work your way up in your paperless bill paying system to be one paycheck ahead and then one month ahead in your bank account. Reaching this spot in your paperless bill paying, it really does become stress-free.
Organize your checklist
Download your free monthly budget checklist. You will find a budget checklist in the Urban Cottage Resource library for getting paid monthly, twice a month, weekly, or bi-weekly. No matter how you get paid, there is a budget checklist for you.
Your budget checklist is a fillable PDF so you can do this all digitally. A paperless desk is a clutter-free desk! If you like a pen and paper, print it out, you can do that too.
After you download your list, rename it with the word “master” attached to it. For example, you may want to name it “2018 Monthly Budget Checklist Master.” Each month make a copy of the budget checklist master and name it for that month. An example would be “August Budget Checklist.”Track your spending
Choose a time each week, to check in on your bank account and track your spending. Access your bank account and compare your budgeted amount to the actual amount. Make sure you are staying on track and that your automatic payments draft when they are supposed to.
Tips for weekly, bi-weekly paydays
Because our calendar months aren’t perfectly four weeks, monthly budgeting becomes more of a puzzle when you are paid weekly or bi-weekly. If this is the case for you, you will want to make your budget as if the month is only four weeks.
My husband gets paid bi-weekly which is every two weeks. Our monthly budget is based on him getting paid twice a month. I use the pay period latest in the month as his “payday #1” and then two weeks later that pay period is “payday #2.” Twice per year, he ends up with an extra payday.
Similarly, when you are paid weekly, then four times per year you will have an extra payday.
Using these extra pay periods is a really easy way to build savings to reach the goal of keeping extra funds in your bank account. Once you are a month ahead in your bank account, then use your extra pay periods to build up your savings.
Here is an example of how to fill out your monthly budget checklist.


